Use the preconfigured templates
The following preconfigured Attestation The act of confirming or attesting that something is true. For example, when punching out, users may need to attest that they took their meal breaks. templates are available from the Attestation Models page.
- Attestation Paycode
- Cancel Specified Meal Break
- Cancel Specified Meal Break for Manual Time Entry
- Complex Meal Form v2
- Complex Meal Form for Manual Time Entry
- Complex Meal Form with Paycode
- Daily Attestation Form v2
- Fix Missing Punches
- Geolocation Consent Form v2
- Meal Lockout Form v2
- Meal Lockout Form for Manual Time Entry
- Missed Punch The entries on a timecard that mark the beginning (in-punch) or end (out-punch) of a work interval, such as the beginning of a shift or transfer. Redirect
- Missed Punch v2
- Predictive Scheduling v2
- Predictive Scheduling for Manual Time Entry
- Simple Question Form v2
- Simple Question form for Manual Time Entry
- Timecard Approve
- Timecard Approval Restriction
- Time Review Form
- Time Review Redirect
Note: In addition to these preconfigured models, additional models are available as Business Process Extensions. To request one of these models, you must submit a Salesforce Service Request to UKG.
Note: An Attestation workflow is essentially the same as a Business Process An organized flow of activities or tasks that achieves a business goal. An automated business process minimizes the amount of paperwork and manual tasks to complete that process by way of automatic actions, online forms, and automatically generated messages. except that it is tagged specifically for Attestation. Earlier versions of the Simple Question Form and Complex Meal form templates are also available on the Business Processes Setuppage.
Simple Question Form
The Simple Question Form and Complex Meal Form templates are available from several pages:
- The Process Models page includes two copies of each template:
- Simple_question_form and Simple Question Form v2
- Complex_meal_form and Complex Meal Form v2
- The Attestation Models page contains the Simple Question Form v2 and Complex Meal Form v2.
As an example, the following explains how to modify the Simple Question Form template. The overall process is the same for other templates. Note, however, that this is a sample, and working in Workflow Designer requires some level of training and understanding of the tool. For more detailed information, see .
- From the Main Menu, go to Administration > Application Setup > Attestation > Attestation Models.
- Select Simple Question Form v2 and click Edit
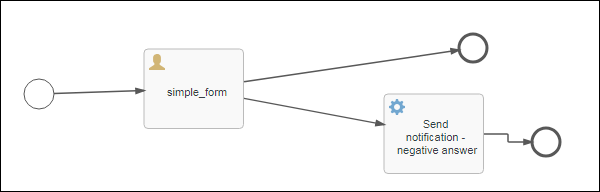
. Workflow Designer opens with the workflow displayed. - The workflow consists of a simple_form block with two answers. One answer ends the workflow and the other sends a notification, then ends the workflow.
-
- To open the editor, click Visual Editor from the upper right corner of the page. The main workflow edit page opens.
The simple_form block contains the text and buttons for the question.
- Select the simple_form block. Notice that the area at the bottom of the screen is dynamic to what you select in the top area.
- Select Referenced form: Simple question form from the bottom area.
- When the Form reference - Simple question form page opens, click Open.
- Select the question and click the Edit icon.
- From the General tab, change the label of the question.

- Select the Options tab and edit the answers or add additional options. Note that the IDs listed are here are important when posting answers. When finished, click Close.
- To change a button label, select a button and click the Edit icon, then enter the new label for the button. You can also drag and drop different types of buttons from the list on the left side.
- When finished, click the Save icon, give your new form a name and description, indicate if this is a new version of the form, and then click Save and close editor to return to the workflow page.


Back on the main workflow page, notice that a notification is configured for a negative answer that links to a generic workflow notification Informs people to run business processes or integrations, complete forms, or respond to events in business processes. Example: Approve a time-off request.. To define the workflow notification:
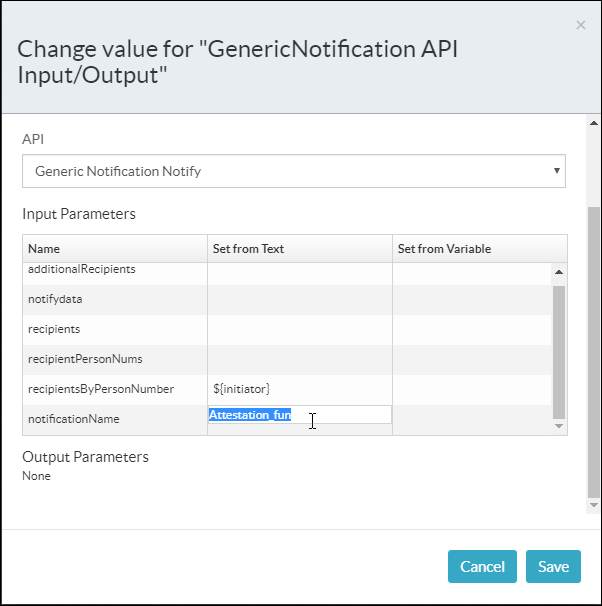
- Select the notification block, then select GenericNotification API Input/Output from the bottom of the page.
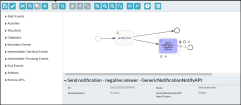
- In the Change value box, change the notificationName field to use a specific workflow notification. Note that the workflow notification referenced is a generic notification and must be configured as described in Generic notifications. The name of the notification must match here and in the generic notification definition.

- When finished, click Save.

Back on the main workflow page for the Simple_question_form, there are four arrows that represent flow sequences.
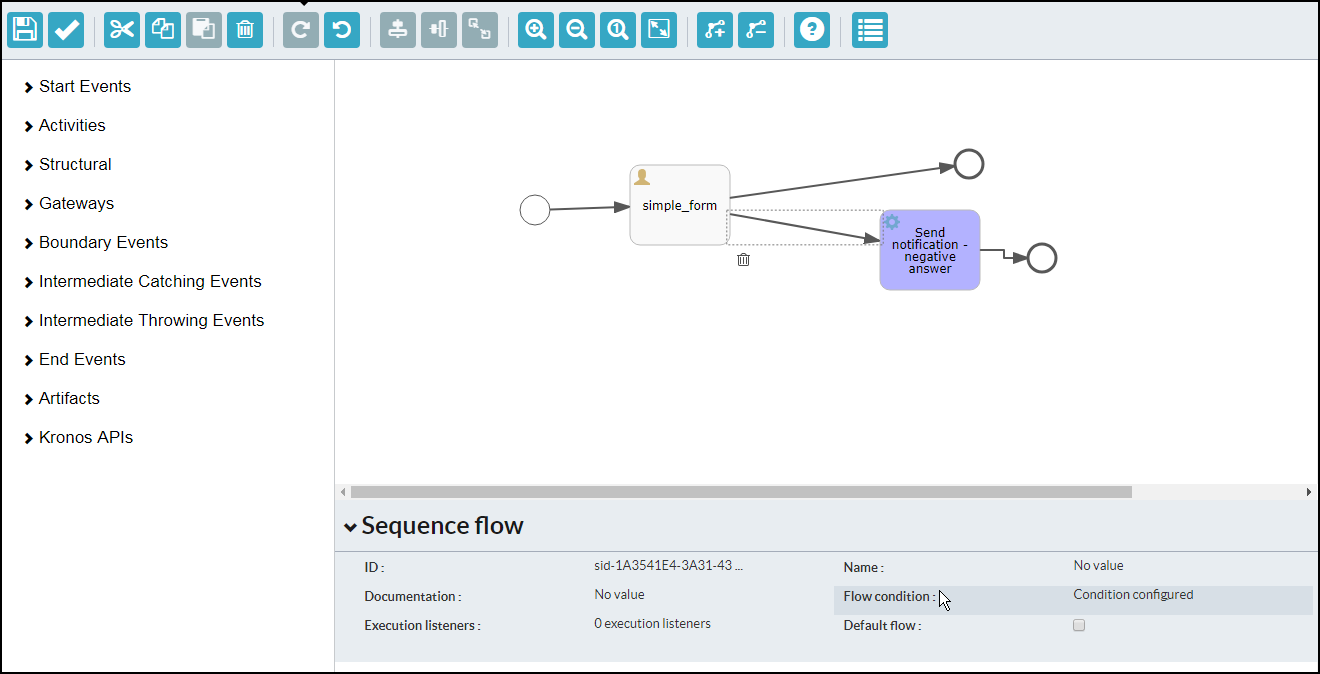
- Select the first arrow. The Flow condition in the bottom area says No condition configured. The same is true for the last arrow. There is no need to change these.
- Select the second arrow. This one is configured for the positive answer. The Flow condition in the bottom area says Condition configured.
- Select the third arrow. This one is configured for the negative answer .The Flow condition in the bottom area says Condition configured.
To modify the configured flow sequences:
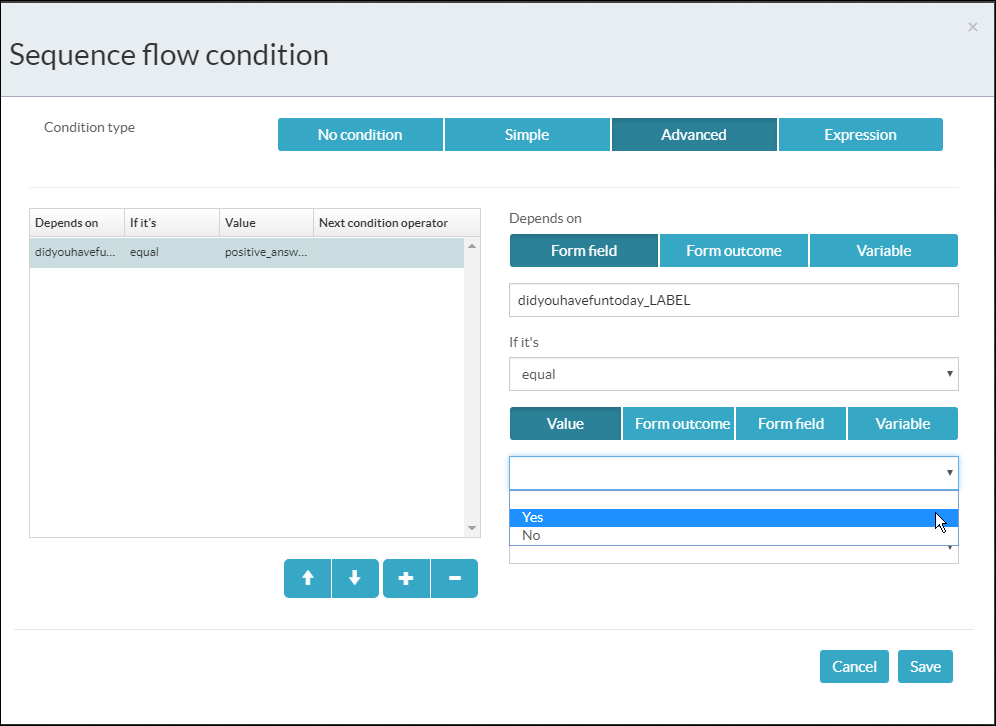
- Select the arrow for the positive answer and then select Flow condition: Condition configured from the bottom area.
- On the Sequence flow condition page, click Advanced and then select the Depends on row and do the following:
- Depends on: Select Form field and then select didyouhavefuntoday_LABEL from the drop-down list.
- Note that you can use either the ID or the Label for the question, but the response must be same (ID or Label).
- If it's: Select equal, then click Value and select Yes from the drop-down list.

- Click Save when finished.
- Select the arrow for the negative answer and then select Flow condition: Condition configured from the bottom area. Repeat step 2.
- Click Save when finished.
- From the main workflow page, click the checkmark icon to ensure that your configuration is configured properly.
- Click the Save icon when finished.
- In the Save Model glance (also known as a contextual callout) Provides information and actions in a dialog box for an item on the screen when the user right-clicks or taps the item., enter the name, description, and comment for the new form and click Save and Return.
- From the Attestation Models page, select the new model and click Deploy
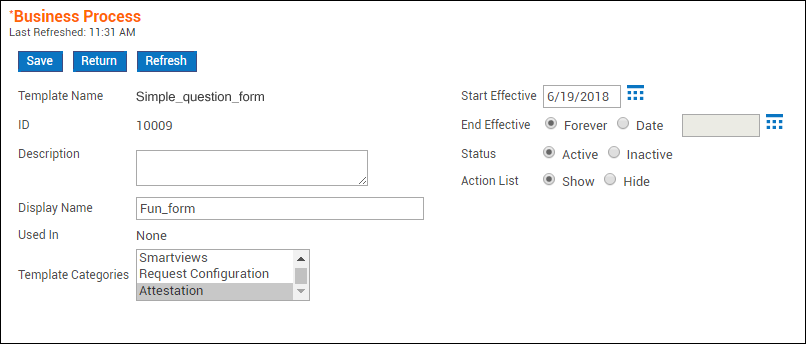
. - In the Business Process glance, enter the name and description of the new form as well as Attestation from the Categories drop-down, start and end dates, Active status and Show in the Action List.
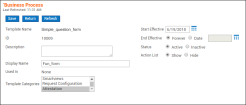
The new form is now listed on the on the Attestation Workflow page.
Attestation Paycode
- From the Main Menu, go to Administration > Application Setup > Attestation > Attestation Models.
- Select Attestation Paycode, click Copy
, give the copied model a new name and description, then click Save. - Select the copied model and click Edit
. Workflow Designer opens with the workflow displayed. 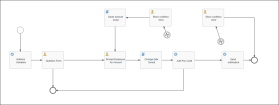
- To open the editor, click Visual Editor from the upper right corner of the page. The main workflow edit page opens.

To modify the copied model, you start with the Initialize Variables task, which contains all of the variables that can be modified to tailor the model to meet your business needs.
- Select the Initialize Variables task, then click Initialize Variables to display the following variables:
- paycode — Defines the paycode to apply in the employee's timecard. The employee must have the permission for the paycode listed in his or her Function Access Control Point and Data Access Profile.
- Default: Hours Worked
- commentName — Defines the comment that the employee's note is associated with. This comment is attached to the paycode edit.
- Default: Empty (text)
- useTransfer — Indicates whether or not the system should use the transfer specified on the timestamp punch for the paycode edit that is generated by the employee’s Attestation response.
- Default: false. The system will not use the transfer the employee selects for their timestamp punch but will instead use the employee's Primary Job and Primary Labor Category information for the paycode edit generated from Attestation.
- If true, the system uses the transfer selected for the timestamp punch for the paycode edit generated by the employee’s Attestation response.
- question — Defines the text of the question presented to the employee in the first Attestation form.
- Default: Sample Text - Do you have travel time to report?
- sendNotification — Defines if a notification is sent based on the workflow configuration.
- Default: true
- errorFormText — Can be modified for language or terminology.
- Default: Sample text - Do you want to enter a new amount?
- Select a variable and provide the content in the Value field. For example, you can change the text for the attestation question.
- Repeat for all the variables you want to use.
- Click Save.
To access the Add Pay Code task, select the Add Pay Code from the workflow and then select AttestationWorkflowAttributes API Input/Output. The input parameters used by the API are listed.
Note: The parameters in this list are informational and are the defaults that support the Hours Worked paycode. The next section explains how they might need to modify these depending on paycode type.
- amountType — Defines the type of paycode used.
- Default: Blank
- paycode
- Default: ${paycode}
- amount
- Default: ${amount}
- endDate
- Default: ${endDate}
- initiator
- Default: ${initiator}
- endDateTime
- Default: blank
- startDateTime
- Default: ${startDateTime}
- commentName
- Default: ${commentName}
- commentNotes
- Default: ${commentNotes}
- transferString
- Default: ${transferString}
- applyDate
- Default: blank
- startDate
- Default: ${startDate}
To define the days that the employee can select when selecting to enter a paycode edit:
- Select the Prompt Employee Form.
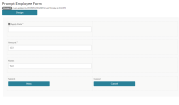
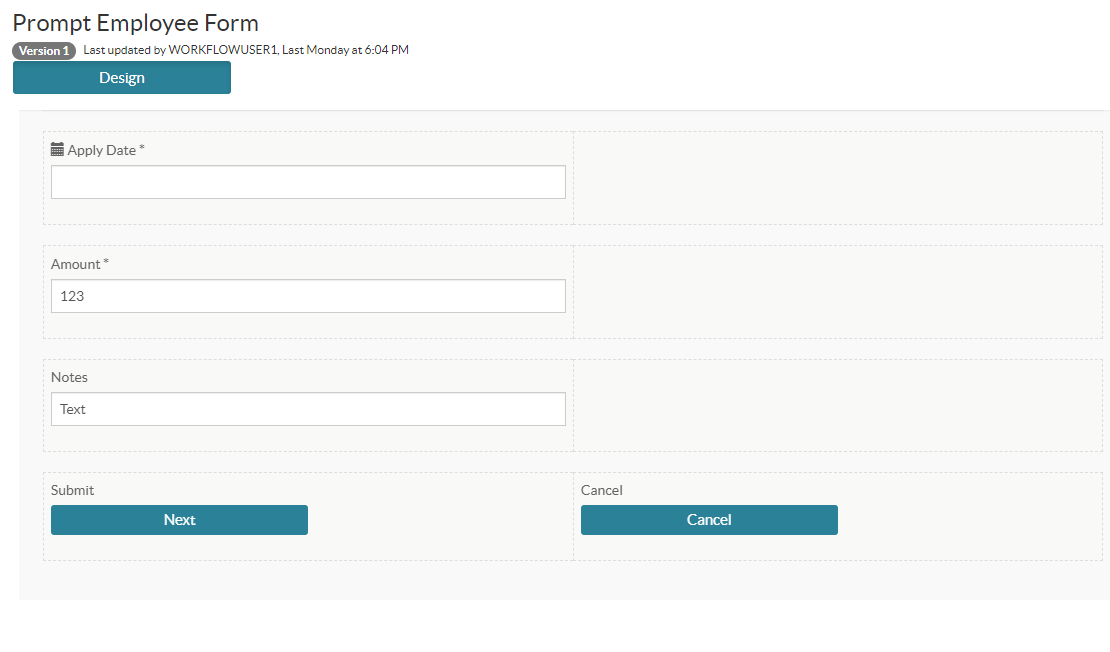
- In the User Task area, select Referenced form and then select Prompt Employee Form in the Form reference glance, and click Open. The Prompt Employee Form opens:
- The Apply Date field is used to put the number of days before and after the current date for the paycode edit to apply to.
- Click in the Apply Date field and select the edit icon. The Edit date field 'Apply Date' glance opens. This glance has two tabs: General and Advanced.
- Click the Advanced tab and enter a positive number in the Minimum Date Offset and Maximum Date Offsetfields.
- Minimum Date (d-M-YYYY) — Do not edit.
- Maximum Date (d-M-YYYY) — Do not edit.
- Minimum Date Offset (Overrides Minimum Date): Enter the number of days before the current day the employee is punching on. Note that this number should be a positive value.
- Maximum Date Offset (Overrides Maximum Date): Enter the number of days after the current day the employee is punching on. Note that this number should be a positive value.
- Click Close.
If needed, you can change the paycode accessed in the workflow. To do this, you use the Initialize Variable task and Add Pay Code task.
To change to hours-based pay code:
- Change paycode variable value to name of hours pay code
- In Initialize Variable task, add a new variable:
- Variable name: amountType
- Variable type: string
- Value: HOUR
- In Add Pay Code API task, update the input parameters:
- Update amountType Set from Text: ${amountType}
- Update startDateTime: Set from Text: blank
- Update applyDate Set from Text: ${applyDate}
To change to days-based pay code:
- Change paycode variable value to name of day-based pay code
- In the Initialize Variable task, add a new variable:
- Variable name: amountType
- Variable type: string
- Value: DAY
- In the Add Pay Code API task, update the input parameters:
- Update amountType: Set from Text: ${amountType}
- Add startDateTime: Set from Text: blank
- Update applyDate: Set from Text: ${applyDate}
To change to money pay code:
- Change paycode variable value to the name of a money paycode.
- In the Initialize Variable task, add a new variable:
- Variable name: amountType
- Variable type: string
- Value: MONEY
- In the Add Pay Code API task, updatethe input parameters:
- Update amountType: Set from Text: ${amountType}
- Add startDateTime: Set from Text: blank
- Update applyDate: Set from Text: ${applyDate}
Complex Meal Form with Paycode
This form is used to enter a paycode edit based on the employee's response to an attestation question.
- From the Main Menu, go to Administration > Application Setup > Attestation > Attestation Models.
- Select Complex Meal Form with Paycode, click Copy
, give the copied model a new name and description, then click Save. - Select the copied model and click Edit
. Workflow Designer opens with the workflow displayed. 
- To open the editor, click Visual Editor from the upper right corner of the page. The main workflow edit page opens.

To modify the copied model, you start with the Initialize Variables task, which contains all of the variables that can be modified to tailor the model to meet your business needs.
- Select the Initialize Variables task, then click Initialize Variables to display the following variables:
- paycode — Defines the paycode to apply in the employee's timecard. The employee must have the permission for the paycode listed in his or her Function Access Control Point and Data Access Profile.
- Default: Hours Worked
- amount — Used to define the amount of the automatic paycode edit based on the employee's answer.
- Default: 1
- commentName — Defines the comment that the employee's note is associated with. This comment is attached to the paycode edit.
- Default: Empty (text)
useShiftStartDate — Defines if the paycode edit is applied to the day the shift starts. If the shift crosses the midnight divide The time when one day ends and another begins. When a shift starts on one day and ends on the next day, the system enters a purple punch to end the first day and another purple punch to start the new day., this can be set to be false to have the paycode edit applied to the date the timestamp punch occurs.
Default: true
- useTransfer — Indicates whether or not the system should use the transfer specified on the timestamp punch for the paycode edit that is generated by the employee’s Attestation response.
- Default: false. The system will not use the transfer the employee selects for their timestamp punch but will instead use the employee's Primary Job and Primary Labor Category information for the paycode edit generated from Attestation.
- If true, the system uses the transfer selected for the timestamp punch for the paycode edit generated by the employee’s Attestation response.
- firstQuestion — Defines the text of the question presented to the employee in the first Attestation form.
- Default: Sample Text - Did you take all of your breaks?
- SecondQuestion — Defines the text of the question presented to the employee in the second Attestation form.
- Default: Sample text - Why?
- sendNotification — Defines if a notification is sent based on the workflow configuration.
- Default: true
- errorFormText — Can be modified for language or terminology.
- Default: Sample text - Do you want to enter a new amount?
- Select a variable and provide the content in the Value field. For example, you could edit the question.
- Repeat for all the variables you want to use.
- Click Save.
To access the Add Pay Code task, select the Add Pay Code from the workflow and then select AttestationWorkflowAttributes API Input/Output. The input parameters used by the API are listed.
Note: The parameters in this list are informational and are the defaults that support the Hours Worked paycode. The next section explains how they might need to modify these depending on paycode type.
- amountType — Defines the type of paycode used.
- Default: Blank
- paycode
- Default: ${paycode}
- amount
- Default: ${amount}
- endDate
- Default: ${endDate}
- initiator
- Default: ${initiator}
- endDateTime
- Default: blank
- startDateTime
- Default: ${startDateTime}
- commentName
- Default: ${commentName}
- commentNotes
- Default: ${commentNotes}
- transferString
- Default: ${transferString}
- applyDate
- Default: blank
- startDate
- Default: ${startDate}
If needed, you can change the paycode accessed in the workflow. To do this, you use the Initialize Variable task and Add Pay Code task.
To change to hours-based paycode:
- Change the paycode variable value to name of the hours paycode.
- In the Initialize Variables task, add a new variable:
- Variable name: amountType
- Variable type: string
- Value: HOUR
- In the Add Pay Codes API task, update the input parameters:
- Update amountType: Set from Text: ${amountType}
- Update startDateTime: Set from Text: blank
- Update applyDate: Set from Text: ${applyDate}
To change to days-based pay code:
- Change the paycode variable value to the name of a day-based paycode
- In the Initialize Variables task, add a new variable:
- Variable name: amountType
- Variable type: string
- Value: DAY
- In the Add Pay Codes API task, update the input parameters:
- Update amountType: Set from Text: ${amountType}
- Add startDateTime: Set from Text: blank
- Update applyDate: Set from Text: ${applyDate}
To change to money pay code:
- Change the paycode variable value to the name of a money paycode.
- In the Initialize Variables task, add a new variable:
- Variable name: amountType
- Variable type: string
- Value: MONEY
- In the Add Pay Codes API task, update the input parameters:
- Update amountType: Set from Text: ${amountType}
- Add startDateTime: Set from Text: blank
- Update applyDate: Set from Text: ${applyDate}
Fix missing punch
Note: The Function Access Profile of employees who use this workflow must have Employee > Attestation > Allow punch edits from Attestation function set to Allowed.
This form enables employees who cannot edit their timecards to fix missing punches from the Attestation panel. To modify the form, complete the following steps:
- From the Main Menu, go to Administration > Application Setup > Attestation > Attestation Models.
- Select Fix Missing Punch, click Copy
, give the copied model a new name and description, then click Save. - Select the copied model and click Edit
. Workflow Designer opens with the workflow displayed. 
- To open the editor, click Visual Editor from the upper right corner of the page. The main workflow edit page opens.
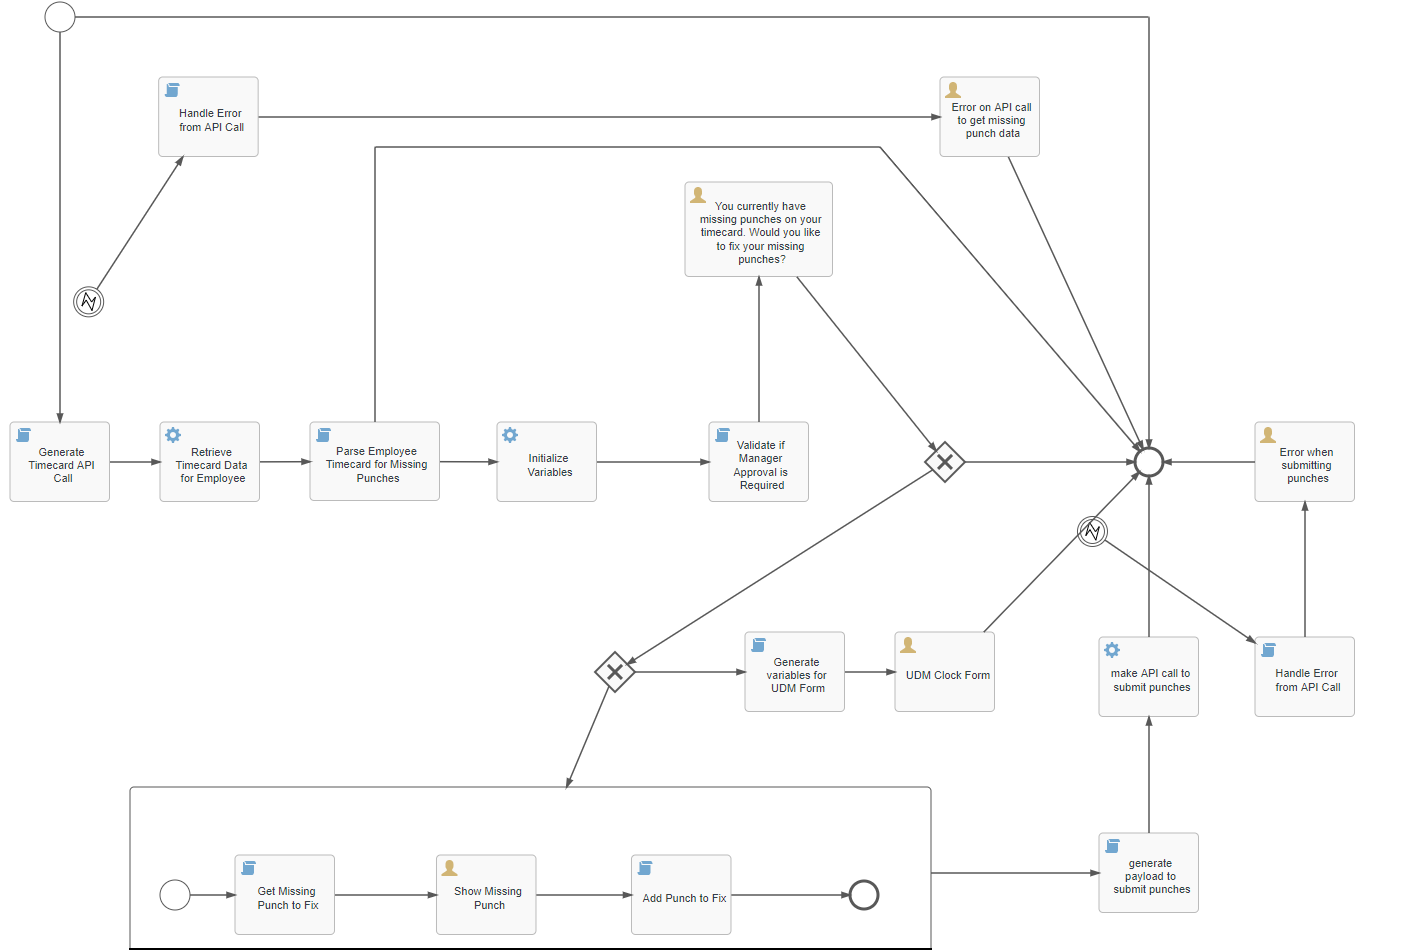
Instead of modifying the text boxes within the workflow, you should define variables in the Initialize Variables task, which contains all of the variables that can be modified to tailor the model to meet your business needs.
- Select the Initialize Variables task, then click Initialize Variables to display the following variables:
- marginDays — Defines the days before and after the exception, for example:
- 0 — The day of the exception
- 1 — One day before and after the day of the exception
- 2 — Two days before and after the day of the exception
- 3 — Three days before and after the day of the exception
- missingPunchQuestion — Defines the question that appears in the Attestation panel when there is a missing punch. The default text is: "You currently have ${totalNumberMissingPunches} missing punches. in your timecard. Would you like to fix them?"
- workflowError — Defines the lead-in sentence when the system encounters an error. The default value is: "The workflow encountered the following:" then the system add the an error message if applicable.
- attestationPunchComment — The default value is "&EMPLOYEE_FIX_MISSING_PUNCH." This causes an automatic comment to be generated in the timecard: "Missed punch fixed by employee." This is required for a note to appear. Do not delete this.
- punchSummaryLabel — Defines the lead-in sentence before the summary of missing punches by date. The default value is "Summary of Punches by Date:" and the system then lists all the punches that need to be fixed on that day.
- currentPunchToFixLabel — Defines the lead-in sentence before the specific punch to fix is displayed. The default value is "Current Punch to Fix:" and the system then lists the punch that needs to be fixed.
- fixMissingInPunchForAbsenceSpan — This is used when there is a full day of missing punches because of an absence. The default value is "You are fixing the missing in-punch for the absence span:" and the system lists the in-punch for the span.
- fixMissingOutPunchForAbsenceSpan — This is used when there is a full day of missing punches because of an absence. The default value is "You are fixing the missing out-punch for the absence span:" and the system lists the out-punch for the span.
- punchDateLabel — Default value is Punch Date.
- punchTimeLabel — Default value is Punch Time.
- notesLabel — Default value is Notes.
- punchSubmittedForManagerApproval — This is used when manager approval is required after the employee fixes the missing punch. The default value is " Your fixed punches will be submitted for approval."
- punchSubmissionError — This is used when the employee makes a mistake correcting the punches. The system generates and error message and displays the text in this variable. The default value is "None of your punches were saved."
- requiresNotesOnClock — This setting is for a future release and is set to "false." Do not change it.
- If necessary, select a variable and change the content in the Value field. For example, you could edit the question.
- Repeat for all the variables you want to use.
- Click Save.
Geolocation Consent Form V2
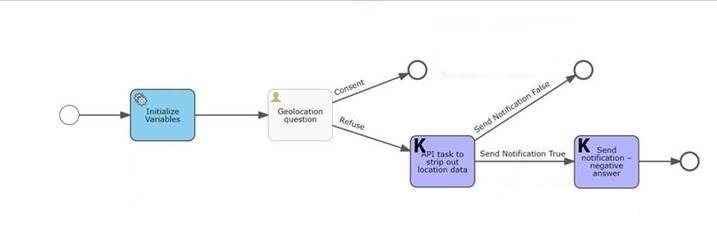
The Geolocation Consent Form V2 presents a form to employees that allows them to consent to having their location tracked by their device. When employees are punching for the first time on their devices, they can be prompted with the consent form. To make changes to the form, follow these steps:
- From the Main Menu, go to Administration > Application Setup > Attestation > Attestation Models.
- Select Geolocation Consent Form V2, click Copy
, give the copied model a new name and description, then click Save. - Select the copied model and click Edit
. Workflow Designer opens with the workflow displayed. 
- To open the editor, click Visual Editor from the upper right corner of the page. The main workflow edit page opens.
To modify the copied model, you start with the Initialize Variables task, which contains all of the variables that can be modified to tailor the model to meet your business needs.
- Select the Initialize Variables task, then click in the Initialize Variables field to open the Change value for "Initialize Variables" box:
- Geolocationquestion — Defines the text of the question presented to the employee in the Geolocation Consent form.
- Default: Sample text - Do you agree to your geolocation data being collected when you punch?
- sendNotification — Defines whether a notification is sent based on the workflow notification.
- Default: true
Set to false if you do not want a notification to be sent to the manager upon the employee answering no to the question. - notificationName — References a specific workflow notification. The notification name must match the name of the notification to be sent.
- Default: Attestation_notification
- To modify the Geolocation Consent form question, select the Geolocationquestion variable and provide the content in the Value field.
- Repeat for all the variables you want to use.
- Click Save.
Predictive Scheduling
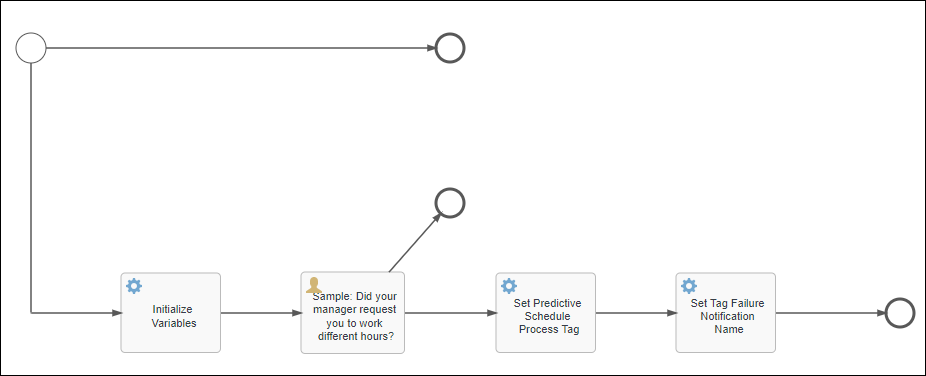
If you have configured predictive scheduling in the Scheduling component, the system ensures compliance with legislation that requires employers to compensate employees for late scheduling changes. The Predictive Scheduling v2 Attestation model enables you to ensure that employees attest that they worked in such a way as to require predictive pay. The model is configured with a sample question, Did your manager request you to work different hours? and two responses: Yes and No. If the employee selects Yes when punching out, the system applies predictive pay. If the employee selects No, the system does not apply predictive pay.
Note: The Predictive Scheduling model is only supported on out punches.
To edit this model:
- From the Main Menu, go to Administration > Application Setup > Attestation > Attestation Models.
- Select Predictive Scheduling v2and click Edit
. When Workflow Designer opens with the workflow displayed, click Visual Editor. 
- The model consists of four tasks. You can edit most of these tasks.
- Task 1: Initialize Variables
- Note: Typically, this is the only task you need to edit.
- Select the Initialize Variables task, then, in the detail section at the bottom of the workspace, click Initialize Variables.
- In the Change value for "Initialize Variables" glance, two "string" variables are listed. You can select each of these variables and enter the required text in the Value column. Click Save when finished.
- Question —This is the question that appears in the Attestation panel.
- failedTagNotificationName — This is the name of the workflow notification that is sent to the employee's manager if the employee requires predictive scheduling pay.
- Task 2: Edit sample text (Sample: Did your manager request you to work different hours?)
- Click the Sample... user task and in the detail section at the bottom of the workspace, click Referenced form.
- In the Form reference - Question Form glance, select the form and click Open.
- Select the Sample text and click Edit
. - On the General tab, the content for the default label, which was provided by the Initialize Variable task, is listed.
- On the Options tab, two options are listed, one for a positive answer and one for a negative answer. To add options, click +Add a new option and enter the applicable information. Click Close.
- From the Question Form, click Submit.
- Task 3: Set predictive scheduling tag A graphic on the schedule that identifies a specific characteristic that applies to a specific employee on a specific day. Not a shift or a pay code. Example: On call.
- This task sets the predictive scheduling tag. You should not change this task.
- Task 4: Set Tag Failure Notification Name
- Select this task and then select AttestationWorkflowAttributes API Input/Output. The following fields are listed:
- Resource ID — This is set to ${initiator}. Do not change this.
- API — Select from the drop-down list, for example, Add Comment
- Input Parameters — The process ID and API selected display here.
After you edit the model, you can set the button and Scheduled Shift condition to trigger the workflow.
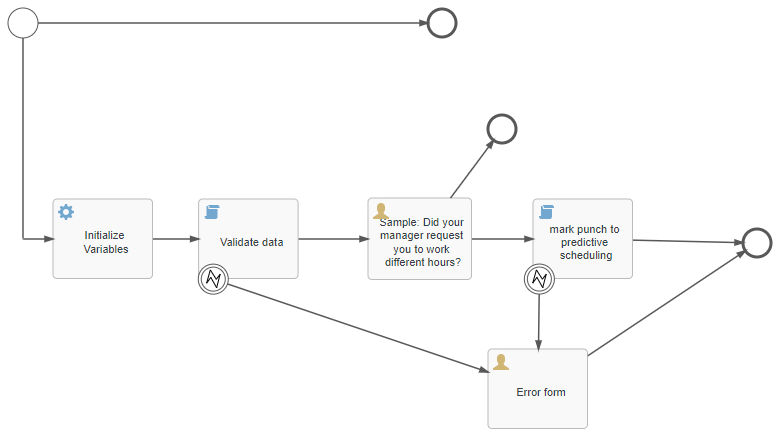
Predictive Scheduling for Manual Time Entry
If you have configured predictive scheduling in the Scheduling component, the system ensures compliance with legislation that requires employers to compensate employees for late scheduling changes. The Predictive Scheduling for Manual Time Entry model enables you to ensure that employees attest when punching out from My Timecard that the resulting shift requires predictive pay. The model is configured with a sample question, Did your manager request you to work different hours? and two responses: Yes and No. If the employee selects Yes when punching out, the system evaluates whether or not the shift is eligible for predictive pay. If the shift is eligible for predictive pay, the system displays the paycode on the timecard and any configured predictive tags on the schedule. If the employee selects No, the system does not evaluate the shift for predictive pay. See Configure Predictive Scheduling for more information.
To edit this model:
- From the Main Menu, go to Administration > Application Setup > Attestation > Attestation Models.
- Select Predictive Scheduling for Manual Time Entry and click Edit
. When Workflow Designer opens with the workflow displayed, click Visual Editor. 
- The model consists of five tasks. You can edit most of these tasks. Note: Typically, only the Initialize Variables and the Sample: Did your manager request you to work different hours? tasks require modification.
- Task 1: Initialize Variables
- The Initialize Variables task initializes variables used during the Attestation and notification processes.
-
- Select the Initialize Variables task, then, in the detail section at the bottom of the workspace, click Initialize Variables.
- In the Change value for "Initialize Variables" glance, two "string" variables are listed: question, and failedTagNotificationName. You can select each of these variables and enter the required text in the Value column. Click Save when finished.
- Question —This is the question that appears in the Attestation panel.
- failedTagNotificationName — This is the value used to configure the Name field in the Attestation workflow notification (Administration > Application Setup > Event/Notification > Workflow Notifications). The notification is sent to the employee's manager if the employee requires predictive scheduling pay. The default name is Attestation_notification, but you can change it as needed. See Create workflow notifications for more information.
- Task 2: Validate data
- This script task validates the data specified in the punch when it is submitted to the system. Do not edit this task.
- Task 3: Sample: Did your manager request you to work different hours?
- This user task displays the Attestation question and its answers to the employee when they punch. Note: The value for the Attestation question is specified in the Initialize Variables task.
- Click the Sample... user task and in the detail section at the bottom of the workspace, click Referenced form.
- In the Form reference - Question Form glance, select the form and click Open.
- Place the pointer over the question/answer field and click Edit
. - On the General tab, the Default Label field displays the value specified in the Initialize Variable task, is listed. To use a different value, change the Question field in the Initialize Variables task.
- On the Options tab, two options are listed, one for a positive answer and one for a negative answer. To add options, click +Add a new option and enter the applicable information.
- Click Close.
- From the Question Form, click Save.
- Task 4: mark punch to predictive scheduling
- This script task marks affirmative Attestations for evaluation to determine whether the shift qualifies for predictive pay. Do not change this task.
- Task 5: Error form
- This user task contains a string and a variable for errors encountered during execution of the workflow. You should not need to change this task.
After you edit the model, you can set the button and Scheduled Shift condition to trigger the workflow.