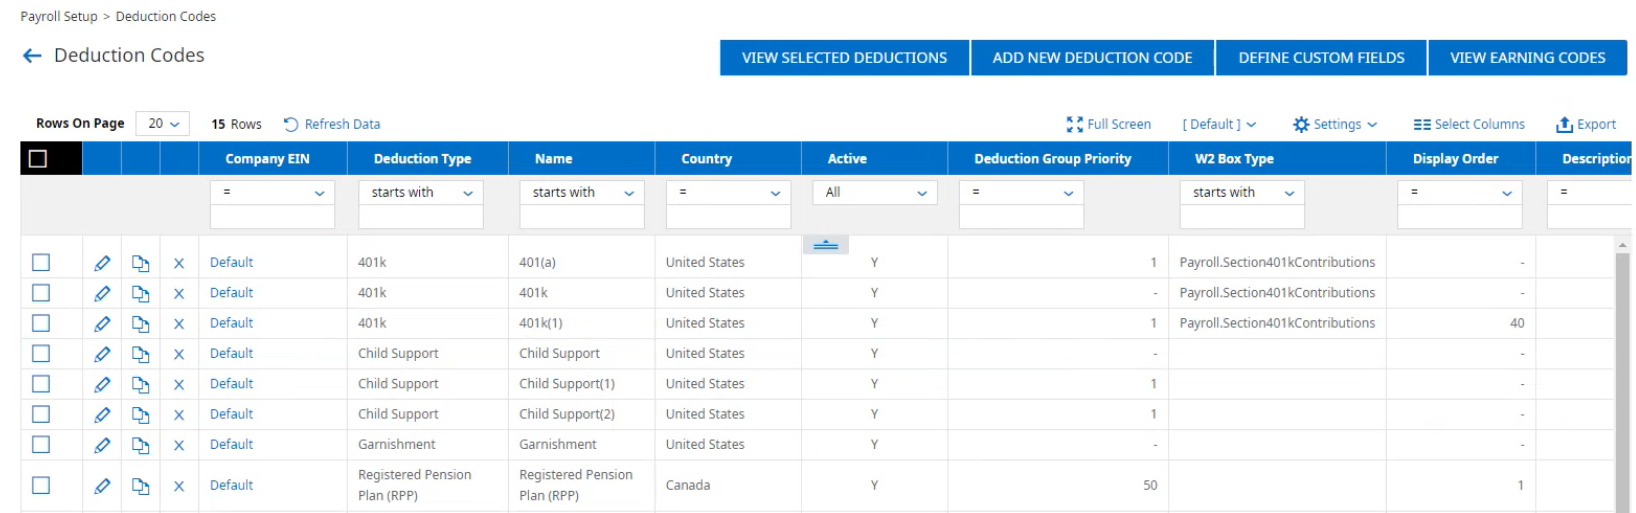
Deduction Codes
The system includes a default list of deduction codes. Each company can have an unlimited number of deduction codes based on specific company requirements. You can edit any of the default deduction codes, create new deduction codes, and set parameters to meet company needs related to any special circumstances for the deduction, such as pretax or post tax.
In addition, you can connect deduction codes to benefit plans. Access deductions codes at Administration > HCM Setup >Settings > Payroll Setup > Deduction Codes.
Adding a New Deduction Code
Follow these steps to create a new Deduction Code:
-
Navigate to Administration > HCM Setup >Settings > Payroll Setup > Deduction Codes.
-
Select the Add New Deduction Code button. The system generates a Question pop-up window asking which country, and the type of deduction code you want to set up. Select the drop-down menu to display the deduction types.
You could choose 401k as the deduction to set up. -
A Settings section displays with more options. Because these options control basic parameters related to the deduction, they can never be changed. Complete the following fields:
-
Roll up Deduction: Use this option to group like-deductions and for reporting of deductions across multiple companies.
-
Has Employee Portion: Select this if the employee is participating in this deduction.
-
Capture Units: Select this to capture units related to this deduction.
-
Has Employer Portion: Select this checkbox if the deduction has (or will have in the future) an employer portion.
If you don't enable the Has Employer Portion checkbox when you first configure the deduction, but you later need to add an employer portion, you will need to create a new deduction to capture both the employee and employer portion of the deduction. Therefore, the deduction history would be divided between those deductions. -
After you select the appropriate settings for the new deduction code, select OK. The Deduction page opens, where you will configure the settings of the new deduction. The Deduction page includes several sections, which are explained in following sections.
Deduction
This widget contains the basic deduction setup information.
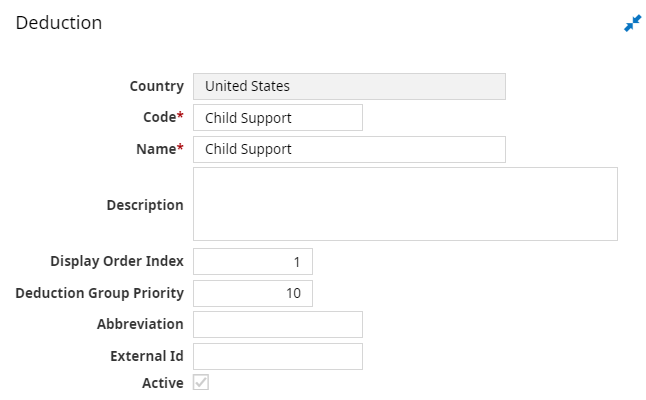
Country: The country associated with the deduction code setup will display in this field.
Code: Enter a unique code that identifies the deduction.
Name: Enter a name that identifies the deduction.
Description: Enter a description that further defines the deduction code. For example, if this is a specific type of deduction only used in certain instances, explain that here to guide users who select the deduction code.
Display Order Index: Enter a numeric value for the deduction that will establish the display order on pay statements and appear in a sortable column in reports.
You can rearrange deductions with the same group priority on the employee deduction setup. If all deductions have the same group priority, deductions can be arranged in any order on the employee.
Deduction Group Priority: Enter a number here to force which group of deductions is processed first during the pay calculation. For example, if you make pretax deductions group priority number 1, they process prior to group priority number 2, which you assigned to Child Support. You can rearrange deductions with the same group priority on the employee deduction setup. If all deductions have the same group priority, deductions can be arranged in any order on the employee.
Abbreviation: Enter an abbreviation for the deduction. This abbreviation appears on the employee Pay Statement.
External Id: Enter a unique link to an external system.
Active: Uncheck the Active box to inactivate this deduction.
Deduction Type
This section contains information related to the deduction type.
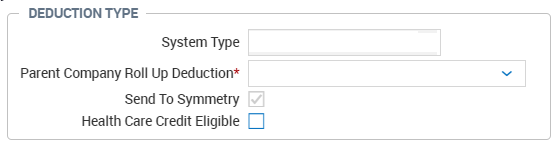
System Type: This is a system-controlled field, which is populated based on the Deduction Type selected.
Parent Company Roll Up Deduction: This is the default deduction type to Roll Up the deduction code into the initially selected option on the Question page. This option is used for global reporting of like deductions across multiple companies regardless of the company naming convention.
Send to Symmetry: This is a system-controlled field, which is populated based on the Deduction Type selected.
Health Care Credit Eligible: Check this box if the deduction is eligible for the Health Care Credit.
Data Settings
This section contains information related to the type of data captured by the Deduction Code.
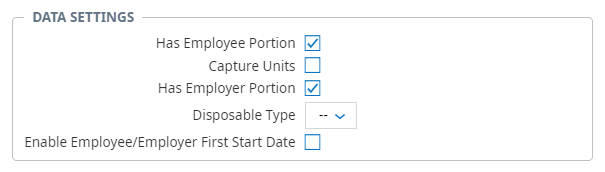
Has Employee Portion: This field can't be edited. This information is carried forward from the question page when you first set up a deduction.
Capture Units: This field can't be edited. This information is carried forward from the question page when you first set up a deduction.
Has Employer Portion: This field can't be edited. This information is carried forward from the question page when you first set up a deduction.
Enable Employee/Employer First Start Date: When you configure a Deduction Code with this checkbox checked, the Employee and Employer widgets for Scheduled Deductions based on this Deduction Code will include a check box for First Start Date and a check box to Allow Override at the EE or ER level. The Allow Override check box will be checked by default, so that the start date can be edited.
The system populates the First Start Date at payroll finalization. The First Start Date will be the pay date of the finalized payroll in which the employee had the deduction withheld for the first time.
Currency: If the company has Multi-Currency enabled, this Currency field will display, and it is set to Universal Currency by default. The Currency field can then be updated to the appropriate currency.
Pay Statement
This section contains the options related to what deduction information will appear on the employee Pay Statement.
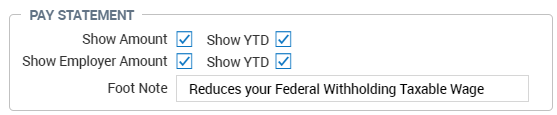
Show Amount: Check this box if you want the Employee deduction amount to show on the employee Pay Statement.
Show YTD: Check this box if you want the YTD Employee deduction amount to show on the employee Pay Statement.
Show Employer Amount: Check this box if you want to show the Employer portion of the deduction on the employee Pay Statement.
Show YTD: Check this box if you want to show the YTD Employer portion of the deduction on the employee Pay Statement.
Foot Note: Enter any clarifying information or explanation related to the deduction that you want to display on the employee pay statement as a footnote.
Options
This section contains additional options related to the Deduction Code.
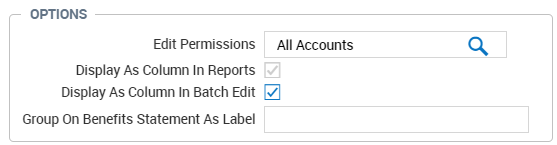
Edit Permissions: This option allows you to control who has access to view this deduction. Security profiles are one way to prevent a user from seeing any deduction. This Edit Permissions field gives you added control over view access.
Display As Column in Reports: This is system controlled and cannot be edited. This option allows the deduction to be included in payroll reports as needed.
Display As Column in Batch Edit: If checked, this allows this deduction type to be included as a column in the payroll batch when processing payroll.
Group On Benefits Statement As Label: Enter the Benefits Statement label that this deduction code should be grouped under when printing the benefits statement.
General Ledger By EIN
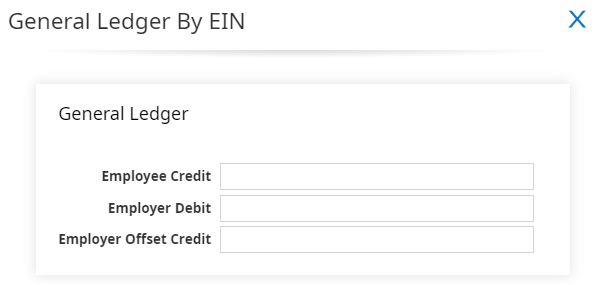
This widget is where you enter GL segment codes for processing amount in the General Ledger for the employee deduction amount (liability), the employer expense, and the employer-associated liability. When you use Secondary GL data, those general ledger segments are also available.
Custom Fields
This widget allows you to select from existing Custom Fields or define new ones. Select the Define Fields link in the header to open a page where you can define the fields.
Scheduled Default Values
This widget is composed of several sub-sections. The general setup information appears first in this section.
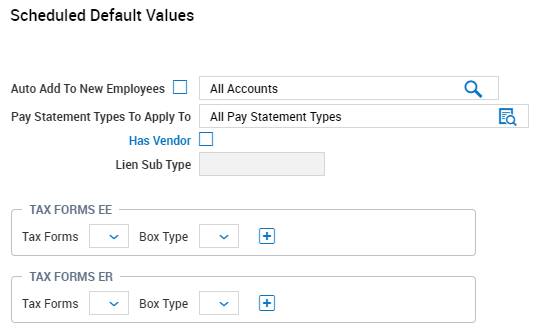
Auto Add To New Employees: Check this box to make the system automatically add this deduction code to all new accounts. Click the Lookup icon if you want to add a filtered list of accounts for which to auto-add this earning code.
Pay Statement Types to Apply To: If you want to limit the Pay Statement Types this deduction should apply to, use the Lookup icon to choose a Pay Statement Type list. If the option you want is not listed, you can create a new list directly from that page.
Has Vendor: Check this box if the deduction is associated with a vendor. After you check the box, a drop-down allows you to select an associated vendor. If you don't select a default vendor when Has Vendor is checked, you must add a vendor at the employee level.
Lien Sub Type: Use this field for Child Support, Bankruptcy, Federal Tax Levy, Federal Student Loan,
Allow Override At EE Level: Select this box to allow the deduction to be overridden at the employee level.
Tax Forms EE
This section includes the following two fields for employee tax forms:
Tax Forms: Select the type of tax form where the deduction will appear.
Box Type: Select the specific box on the tax form where the deduction will appear.
You can select the + icon to add more tax forms and box types.
Tax Forms ER
This section includes the following two fields for employer tax forms:
Tax Forms: Select the type of tax form where the deduction will appear.
Box Type: Select the specific box on the tax form where the deduction will appear.
Employee
Configure settings in this section related to the handling of the employee portion of the deduction in this section.
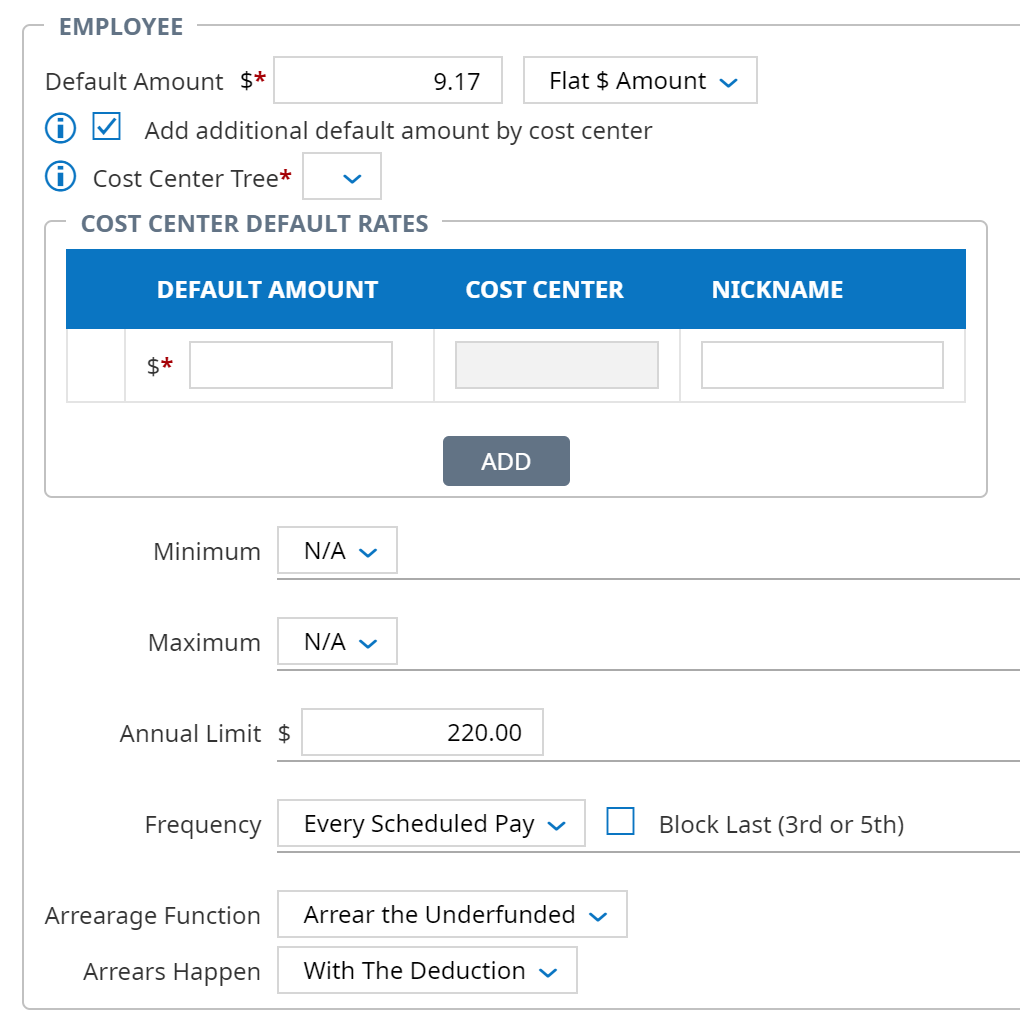
Default Amount $ [Amount] [Amount Type]: Here, you establish a default amount for the employee deduction. Enter an amount in the first box and then select the type of amount to apply to the amount entered from the drop-down. Based on what you select, you see additional fields to complete:
-
Flat $ Amount: When you select this default, the system allows you to enter a Default flat amount for the deduction.
-
% of Disposable Earnings: When you select this default, the system allows you to enter a Default percentage of Disposable Earnings for the deduction.
-
% of Earnings List: When you select this default, the system requires you to select an existing Earnings List or establish a new Earnings List.
-
% Of Earnings + Deduction List: When you select this default, the system allows you to enter a percentage to apply to the total of the selected Earnings List plus the total of the selected Deductions list.
-
% Of Earnings – Deduction List: When you select this default, the system allows you to enter a percentage to apply to the net amount of the selected Earnings List less the total of the selected Deductions List.
-
% Of Gross Earnings: When you select this default, the system allows you to enter a percentage to apply to the total Gross Earnings.
-
% Of Net Pay: When you select this default, the system allows you to enter a percentage to apply to Net Pay.
-
Formula Based: When you select this default, the system allows you to establish a formula-based deduction. You can create up to 10 calculation steps in a given formula. The calculation result is the amount of the deduction used when the payroll is processed. You can override the formula at the Employee level if needed.
-
Rate * Hours: When you select this default, the system allows you to enter a percentage to apply to hours contained in a specific Earnings List.
Add additional default amount by cost center: When you configure deduction codes for one deduction that has amount differences based on department, you no longer have to configure separate deduction codes for those departmental differences. You can enable this Add additional default amount by cost center setting to create cost center (department) filters that you can use, so that you can create just one deduction code and use it for all the different departments. If you enable this setting, the options become available for you to select a cost center tree and add default rates.
If you enable the Add additional default amount by cost center setting and save, the system provides the following reminder message:
Minimum: Use this to establish a Minimum amount for the employee deduction. Enter an amount in the first box and then select the type of amount to apply to the amount entered. The same calculations available for the previous fields are available here, in addition to N/A.
-
N/A: Select this if there is no Minimum employee deduction requirement.
Maximum: Use this to establish a Maximum amount for the employee deduction. The same calculations available for the previous fields are available here, in addition to N/A.
-
N/A: Select this if there is no Maximum employee deduction requirement.
Annual Limit: Enter an annual limit to apply to the employee deduction if applicable.
Frequency: Enter the Frequency with which the employee deduction is processed. If you select Every Scheduled Pay, you see a box to block the last payroll deduction of the month, the third payroll for bi-weekly payrolls, or the fifth payroll for weekly payrolls, in months when an extra payroll is processed.
When you select Monthly, Quarterly, or Annual, you see options to define further which payroll in the month, quarter, or year.
Arrearage Function: Use this field to establish how the system handles deductions when there are insufficient earnings to withhold the scheduled deduction.
-
Discard Underfunded Amount: When there are insufficient earnings to withhold the full deduction amount, the underfunded amount will be discarded. The employer can choose to forgive this amount or enter a manual adjustment to recover the amount from the employee on the next available pay statement.
-
Arrear the Underfunded: When there are insufficient earnings to withhold the full deduction amount, the underfunded amount will be moved to the Adjustments section of the employee’s file to be recovered on the next Pay Statement with sufficient earnings.
-
Discard the Entire EE Deduction: When there are insufficient earnings to withhold the entire deduction amount, the entire deduction amount will be discarded. The employer can choose to forgive this amount or enter a manual adjustment to recover the amount from the employee on the next available Pay Statement.
-
Arrear the Entire EE Deduction: When there are insufficient earnings to withhold the full deduction amount, the entire deduction amount will be moved to the Adjustments section of the employee’s file to be recovered on the next Pay Statement with sufficient earnings.
-
Move Underfunded to ER and Discard: When there are insufficient earnings to withhold the entire deduction amount, the underfunded amount will be moved to the Employer in order to pay the vendor and then discarded. The employer can choose to forgive this amount or enter a manual adjustment to recover the amount from the employee on the next available Pay Statement.
-
Move Underfunded to ER and Arrear: When there are insufficient earnings to withhold the entire deduction amount, the underfunded amount will be moved to the Employer in order to pay the vendor and then discarded. The underfunded amount will be moved to the Adjustments section of the employee’s file to be recovered on the next Pay Statement with sufficient earnings. When the amount is recovered, it will again adjust the employer portion to keep the deduction in balance.
Arrears Happen: Use this field to establish when the system performs the arrearage recovery. Each option is dictated by the priority established at the company level deduction setting and the priority in which the deduction is listed at the employee level on the Payroll tab in the Deductions section.
-
With The Deduction: The system will attempt to take the deduction arrearage amount immediately after the scheduled deduction is scheduled.
-
At The End of The Group: The system will attempt to take each deduction in the deduction Group (based on the Deduction Group Priority) before recovering each deduction arrearage in the group.
-
After All Scheduled Deductions: The system will attempt to take each deduction scheduled on the employee’s file before recovering any arrearages.
When you select the Employer Service Fee Deduction Type, the When To Withhold field appears only for this Deduction Type under the Employee section. Under this drop-down are options to select Always, Only When The Deduction Is Withheld, or Until The Deduction Reaches The Goal. The options do the following:
-
Always: This provides the same behavior as previously existed for Service Fee. The fee will always be withheld until the deduction end date is reached. All existing Employer Service Fee deductions will have this value by default.
-
Only When The Deduction Is Withheld: This will cause the Employer Service Fee to withhold only when the parent deduction (such as the garnishment) withholds a non-zero amount. The Employer Service Fee will also withhold when the parent deduction is configured with an arrears deduction, and the arrears deduction withholds a non-zero amount. Choose this value if you do not want the employee to be charged when there is no garnishment amount to submit to the payee.
-
Until The Deduction Reaches The Goal: This will cause the Employer Service Fee to always withhold until the Goal is met, even if the parent deduction or its arrears deduction do withhold. If there is no Goal amount configured, this setting will behave exactly like Always.
Employer
In this section, configure settings related to the handling of the employer portion of the deduction. The same options available in the Employee section are available here.
Default Amount $ [Amount] [Amount Type]: Use this to establish a default amount for the employer deduction. Enter an amount in the first box and then select the type of amount to apply to the amount entered from the drop-down. Based on what you select, you see additional fields to complete.
-
Flat $ Amount: When you select this default, the system allows you to enter a Default flat amount for the deduction.
-
Retirement Plan Roth Catch Up Deduction: When you select this default, the correct calculation method will be used to calculate the Roth Catch Up deduction for "High Wage Earners" who are 50 or over. For more information, see the Roth Catch Up for High Earners 50 or Over User Guide.
It is recommended to update the Frequency drop-down in the Employee section to Every Pay. -
% of Disposable Earnings: When you select this default, the system allows you to enter a Default percentage of Disposable Earnings for the deduction.
-
% of Earnings List: When you select this default, the system requires you to select an existing Earnings List or establish a new Earnings List.
-
% Of Earnings + Deduction List: When you select this default, the system allows you to enter a percentage to apply to the total of the selected Earnings List plus the total of the selected Deductions list.
-
% Of Earnings – Deduction List: When you select this default, the system allows you to enter a percentage to apply to the net amount of the selected Earnings List less the total of the selected Deductions List.
-
% Of Gross Earnings: When you select this default, the system allows you to enter a percentage to apply to the total Gross Earnings.
-
% Of Net Pay: When you select this default, the system allows you to enter a percentage to apply to Net Pay.
-
Formula Based: When you select this default, the system allows you to establish a formula-based deduction. You can create up to 10 calculation in a given formula. The calculation result is the amount of the deduction used when the payroll is processed. You can override the formula at the Employee level if needed.
-
Rate * Hours: When you select this default, the system allows you to enter a percentage to apply to hours contained in a specific Earnings List.
Minimum: Use this to establish a Minimum amount for the employer deduction. Enter an amount in the first box and then select the type of amount to apply to the amount entered. The same calculations available for previous fields are available here, in addition to N/A.
-
N/A: Select this if there is no Minimum employee deduction requirement.
Maximum: Use this to establish a Maximum amount for the employer deduction. The same calculations available for previous fields are available here, in addition to N/A.
Frequency: Enter the Frequency with which the employee deduction is processed. If you select Every Scheduled Pay, you see a box to block the last payroll deduction of the month, the third payroll for bi-weekly payrolls or the fifth payroll for weekly payrolls, in months when an extra payroll is processed.
When you select Monthly, Quarterly, or Annual, you see options to define further which payroll in the month, quarter, or year.
There is a box to block the last payroll deduction of the month, the third payroll for bi-weekly payrolls or the fifth payroll for weekly payrolls, in months when an extra payroll is processed.
Cost Center Defaults
If you want this deduction to be allocated as a default to one or more Cost Center trees, indicate the Cost Center by selecting the look-up icon to display a list of the available Cost Centers.
After you select a Cost Center, the Cost Center Defaults section is updated.
On the right side on the Deduction page, you see checkboxes to override certain fields at the employee level. If you do not want these deduction fields to be changed at the employee level, or if they should have permanent settings, uncheck these boxes. When you check the boxes, you have the ability to change this information when entering a deduction for an employee.
In Extra Fields, you can enable any existing Active Extra Fields for use with the deduction.
Define Eligibility
In this section, to define eligibility based on employee start date/hired date, employee work hours, and a waiting period, select the checkbox next to Based On Dates Or Hours. This provides further options to define the employee's eligibility.

If you select Start Date/Hired Date, the following options become available:
EE Eligible Date: From this list, select the time for employees to become eligible following the waiting period. Options are Immediately, First of Month, and First of Quarter. First of Month is the first of the following month, and First of Quarter is the first of the following quarter.
EE Waiting Period: Enter a number. Then select whether the number is Days, Months, or Years. Then select whether the period is after Date Started or Date Hired. If you select Date Hired, the system looks at the employee re-hired date first. If you leave it empty, it looks at the date hired.
ER Eligible Date: This list lets you select from the same options as EE Eligible Date and apply those for the employer.
ER Waiting Period: This list lets you select from the same options as EE Waiting Period and apply those for the employer.
If you select Eligibility Based On Work Hours, the following options become available:
EE Eligible: From this list, select the time for employees to become eligible following the configured number of hours worked. Options are Immediately, First of Month, or First of Quarter. First of Month is the first of the following month, and First of Quarter is the first of the following quarter.
EE Hours Required: Enter a number of hours. Then select whether the employee becomes eligible that number of hours after Date Started or Date Hired. If you select Date Hired, the system looks at the employee re-hired date first. If you leave it empty, it looks at the date hired.
Work Hours Earning List: Select or create an earning list that applies to the employee work hours.
ER Eligible: This list lets you select from the same options as EE Eligible and apply those for the employer.
ER Hours Required: This list lets you select from the same options as EE Hours Required and apply those for the employer.
Work Hours Earning List: Select an earning list that applies to the employer work hours.
Eligibility Date in Employee Information Records
After you configure the Define Eligibility section of a deduction and assign the deduction to employees, Employee Information records for those employees display Eligibility Date fields. The Settings: Employee section shows the employee eligibility date. The Settings: Employer section shows the employer eligibility date. The system populates these fields with the dates you configure in the deduction.
If there is a deduction containing eligibility settings that have been used in a closed pay statement, the eligibility settings will be grayed out on the deduction code. A message will appear on the pay statement that will alert the user as to why the scheduled deduction is not withholding.
Part Of The Following Lists
In this widget you can check the box for an existing list or create a new list.
After you complete all information for the deduction, select the Save button to save the new deduction.
From the Deduction page, you can select codes and employees assigned to the codes to viewing or take an action on. Select the checkbox next to the deduction code, then select the View Scheduled Deductions option to display the details of the code.
On the Deduction page, select the View Scheduled Deductions button. You will be taken to the Scheduled Deductions page, and all employees assigned to the deduction code appear. From the Scheduled Deductions page, you can select one or more employees, and the following actions are available:
-
View Selected: You will be navigated to the employee's Scheduled Deduction page with their specific deduction information assigned.
-
Add New Deduction: You can add a new deduction to the selected employee(s).
-
Mass Edit Selected: You can mass edit selected deductions of the same Deduction Type.
-
View Deduction Codes: You will be navigated to the Deduction Codes page where all deduction codes are listed.
-
Mass Add Adjustments: You can add deduction adjustments to multiple employees at the same time.
-
Delete: You can delete employees assigned to the deduction.